Resize Images for better User Experience and Better Page Load Performance
“How to Resize photos for a Website” was written by James Hipkin, drawing on his many years of experience working with small business owners.
Knowing how to resize images for their websites can be daunting for many business owners. There are lots and lots of places to find images. Some are free, and some you need to pay for, but many website owners struggle once they have the photos. They want to know how to resize website photos for their website without buying expensive software or hiring a designer.
“I’m not a designer, I don’t have or know Photoshop.”
No problem.
Why Resizing Photos for Your Website Matters
Website owners will also often ask us, “Why? Why do I need to resize photos at all?”
Images contribute to the success of your website in several ways. They make the content more appealing, and with careful use of alt tags, images provide additional information to the search bots that will help your page or post rank. In addition to the impact images have on page quality, large photos impact page-load performance, and page load performance is a Google ranking factor. It’s also the first of the six ways to ensure visitor engagement in six seconds or less. Finally, page load performance is a trust event. When we perform the Six Second or Less website audit, poor page load performance is common, and more often than not, image size is a significant contributing factor.
Resizing Photos for Website Performance
Back to the subject at hand, “How to resize photos for a website?”
Canva will get you there.
Canva is a user-friendly, inexpensive tool any small business owner can use to resize website photos.
Resizing the images in Canva
There are two methods available for resizing images using Canva. The first method is manual, and the second describes Canva’s single-click resizing tool.
(Method one) Manual Photo Resize
A more intuitive and obvious way of resizing the images is by doing it manually. Select a corner and drag to the required size. If you select the shift key while dragging, the image will maintain its aspect ratio. It is a suitable method if you do not need to conform to certain aspect ratios or specific formats. You may choose a photo in Canva by clicking on the “Photos” tab and selecting a photo by double-clicking it. After selecting it, it will automatically appear on the layout page, or drag the image to the layout page. If you click on this image, you will find markers to resize it manually.
If you want to resize the image horizontally or vertically, you can do this from the sides. If you are looking to resize for both dimensions, you may do it by dragging the image from one of the corners. You can find a size indicator close to the cursor when you do that.
Sometimes you may have a specific size in mind. It is possible to type in the preferred size into the size fields of Canva. The first available field is for the image’s width, and the second is used for height.
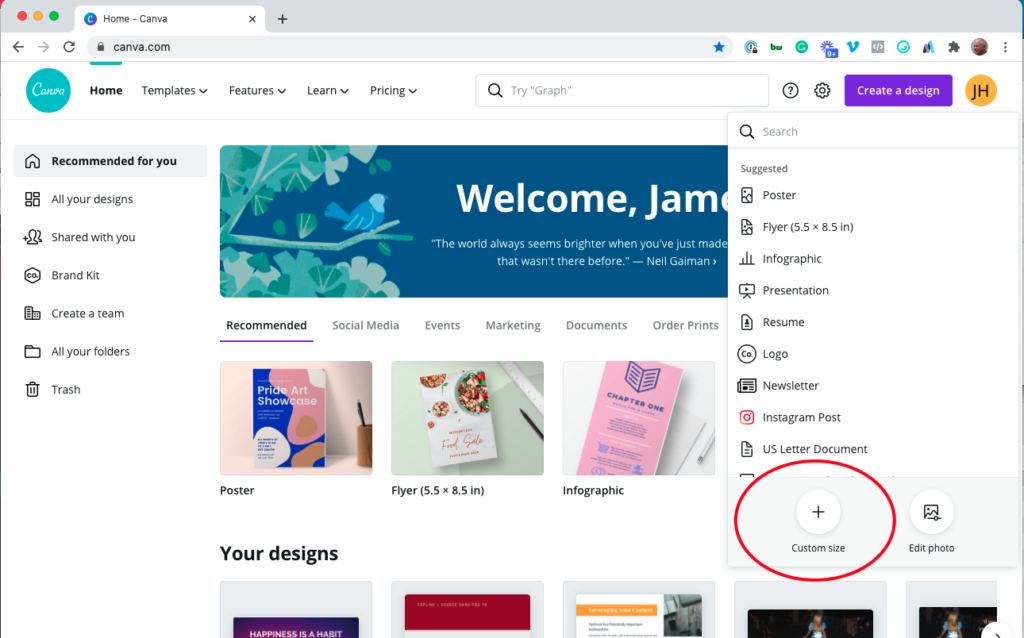
All you need to do is click “Create Design” on the top right side of Canva’s Home page. You will see a ‘plus’ sign below that says “Custom Size.” Once you click it, you will have the option to input your preferred image dimensions. There’s also a dropdown for the measurement units: Pixels, Inches, Millimeters, and Centimeters.
Although the method is straightforward enough, it’s a good way to resize images for a website, it might turn out to be a little inconvenient. If you upgrade to Canva Pro, there are better alternatives available.
(Method 2) Single-click Resize
As can be expected, the best features available with the software are saved for paying customers. Canva Pro offers several useful tools, and one of them is the single-click or one-click image resize. At the topmost menu bar, you can find a Resize button that lies between the buttons File and Undo. When you click the button, you will find a dropdown menu to resize the photo within a second!
So, if you want to make a poster from an image, the first thing to do is right-click on the photo and then choose “Set as background.” At this point, you can type in any customized size, and the image will be resized to it.
How to Resize Images for a Website Photos Like a Pro – 10 Simple Steps
This how-to guide to resizing photos uses the free version of Canva. It’s a good resource. Even the free version lets you accomplish more than we’ve described here. You’ll have even more capabilities if you upgrade to Canva Pro.

- To resize website photos, start by determining the sizes needed. If the theme suggests multiple sizes, then use the largest one. For example, WooCommerce recommends a square image in three sizes. Provide the largest, 600px x 600px, and WordPress will resize it to create the smaller sizes that WooCommerce needs. You can also consider going to two times the largest size. This will give WordPress images to serve when a device has a retina display.
- To create the 600px X 600px image, sign up for Canva – this is a user-friendly design tool that’s so easy even I can use it.
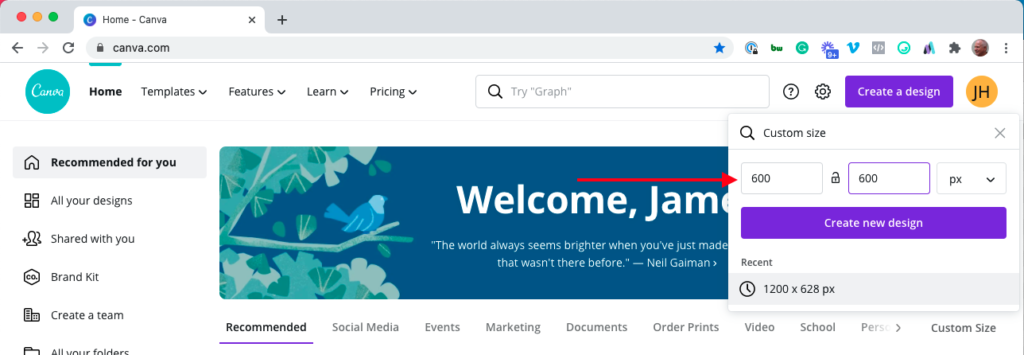
- Start by selecting “Create a design” and use the dimensions you identified in step one, 600px x 600px.

- Select Custom Size from the choices presented in the dropdown. You can enter a custom size as described in the next section or select one of the prebuilt designs provided by Canva. The first dimension is the width, and the second is the height.
- Enter the size you want to use.
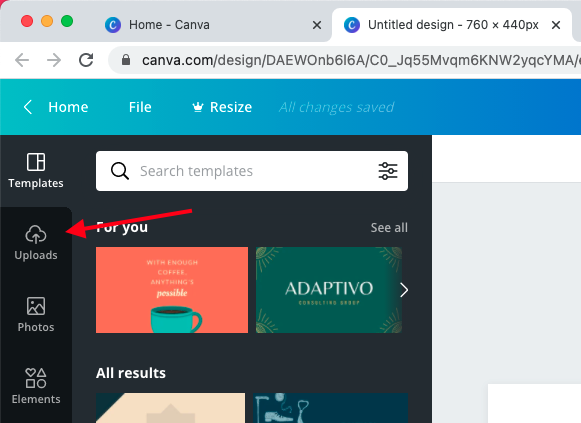
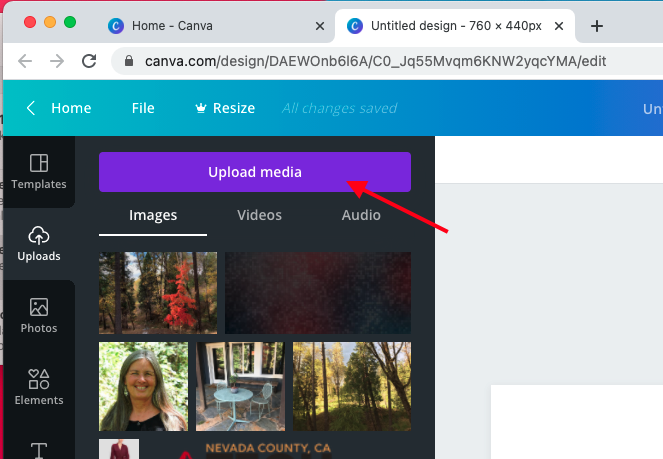
- Use “Uploads” in the left sidebar to upload the image you want to use or select an image from the Canva photo library. Double-click the image you’ve selected or upload it to place it into the design frame you created earlier. You can also click and drag the image into your design. Ideally, the image you plan to work with is larger than the final size and has a similar aspect ratio. Making the image smaller is OK, but making it larger will decrease the quality. You could make a photo bigger to fit into the design frame if it was a high-resolution image to start with. But if you make a much larger low-standard-resolution image, it will impact quality.
- Move it around so that the image is composed as you wish within the design template—you can change the background color to match the image background if there is a white bar, which can happen when the photo’s aspect ratio isn’t the same as the template you created. Select Background from the choices in the left sidebar navigation.
- This is optional, but sometimes, adding some text to the image is a good idea. For example, this works well on image-oriented social media channels like Pinterest or Instagram. Select Text from the left sidebar to add text as an overlay. You can adjust the shape of the text box, the font and its color, and size.

- When you are happy with the layout, select the Download button. You will find it in the upper right corner of the screen. Choose “JPG” from the presented options. Jpegs aren’t as heavy as PNG files. If your design has a transparent background, select the PNG file format.
- Upload this image into your Media Library and use it as desired.
Ten steps may seem like a lot of steps, but with some practice, it’s quite easy to resize images for your website. It goes quickly once you are in the flow.
Resize Website Images Using Canva Alternatives
If you are looking for some alternatives for Canva, here are a couple of them to assist you in creating photo designs that will stand out. You can decide the best option for your requirements.
Stencil

Stencil is a simple graphic design tool, and the main idea for its use is to create background images and place text over them. The editing features offered by the software are simple to use. The Stencil editor has a section that provides quotes; this is a good addition. All you need to do is select a quote, which immediately gets added to the photo you choose as the background. Stencil can be used by people looking to create content quickly without using more tools.
Stencil is an especially effective tool for resizing images for a WordPress website. Using the Stencil plugin for WordPress is a fast way to find and resize the photos of your pages or posts.
Visme
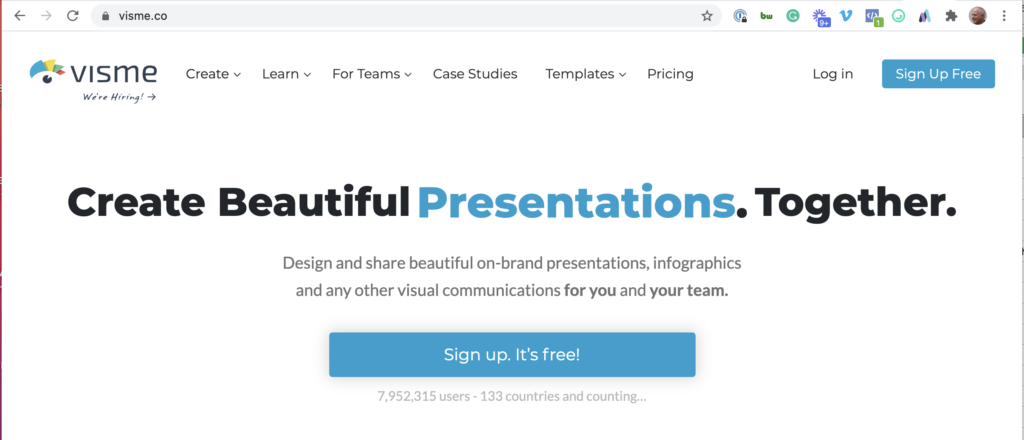
Visme is a graphic design tool with many more features than standard tools. It has a drag-and-drop editor that is simple to use, intuitive, and comes with several features. A built-in photo editor in Visme allows you to enhance the images from within your browser. There is no need to use a separate tool for adding overlays and filters, cropping, resizing, or rotating the images. The various photo-editing tools available allow royalty-free stock photos, drag-and-drop, or you can even upload your photos.
How to Resize Photos for a Website Like a Pro – Summary
Several other features are available in Canva Pro, such as automatic resizing based on the intended use. You can also select multiple sizes and develop several copies of the images with different sizes. We highly recommend giving the Canva Pro a shot. It is relatively inexpensive and one of the best available web-based image editors.
Stencil is another excellent alternative. After installing the Stencil WordPress plugin, you can resize images for your website without leaving the CMS dashboard.
We have no relationship with Canva. We think it’s a cool, inexpensive product that allows non-designers to manage images and create visual assets for WordPress without climbing the Photoshop learning curve.
This post appeared originally on Red8 Interactive’s site: MANAGING WORDPRESS IMAGE SIZE WITH CANVA. Red8 is the team behind Inn8ly.
Author: James Hipkin
Since 2010, James Hipkin has built his clients’ businesses with digital marketing. Today, James is passionate about websites and helping the rest of us understand online marketing. His customers value his jargon-free, common-sense approach. “James explains the ins and outs of digital marketing in ways that make sense.”
Use this link to book a meeting time with James.

